Hello, thank you for choosing PROtect. In this short guide we will explain how to use PROtect’s various functions.
Table of contents
- The PROtect Image
- How to hide additional results
- How the “PROtect Takedown Requests” function works
- How to add a picture to “PROtect Takedown Requests”
- Filling out your personal data
- Where to track the progress of your takedowns
- What the purpose of the “Close case” function is
- What self-report is
- What the agent time is
Starting with PROtect - before you order photos to be removed
The PROtect Image is the picture that will be used in order for our search engine to find photos with your face in it. A good fit for a PROtect Image would be a picture that is of good quality, full colour, and where the entire face is visible.
Setting up yours is quite easy! Perform a search on our website and then click on the “Set PROtect Image” button which will appear at the top of the results page.
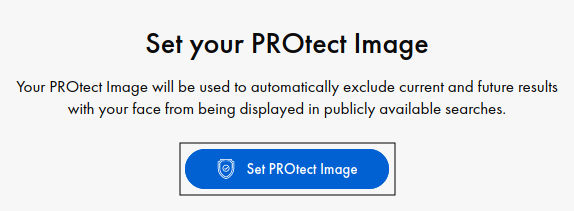
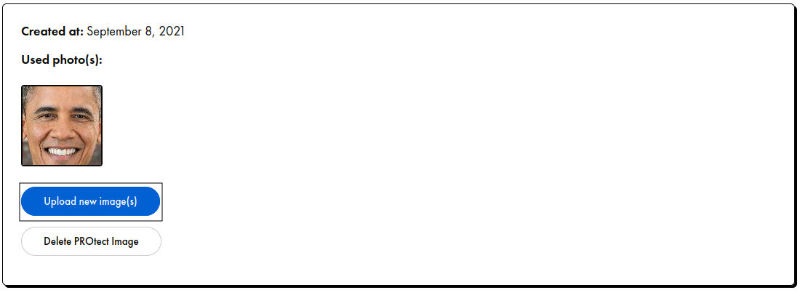
You can choose more than one photo and edit your PROtect Image at any given time under the PROtect tab in your user’s panel.
Whenever we find any new results containing your face, you will be informed via email. All the new results are automatically blocked from being displayed in searches. They are available only for you, in the user’s panel.
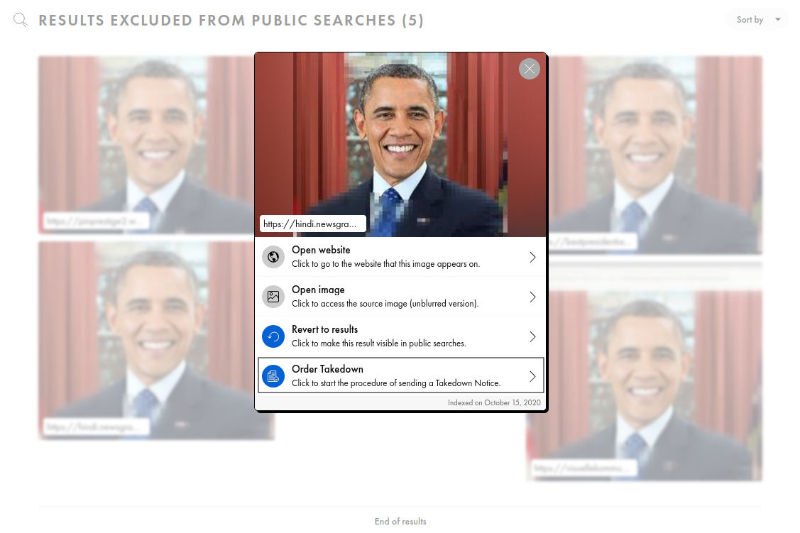
Now that you have chosen your PROtect Image, the results with your face have stopped showing up on our website. However, you can hide any additional results found on PimEyes by clicking on the “Exclude from public results” button which appears after you click on a certain picture.
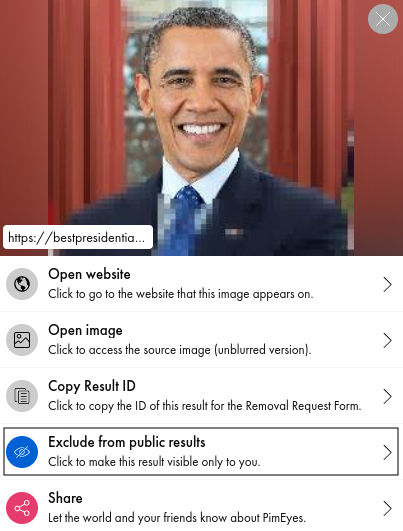
Confirm your choice by then clicking the “Add to PROtect” button in the new window.
The “PROtect Takedown Requests” function is designated to help you have your pictures removed from the websites they’ve been uploaded to. However, we would like to point out that the process isn’t always successful. Below you can find a short image-based guide showing you how to utilize the function.
Removing your pictures from external websites
How to add a result to “PROtect Takedown Requests”
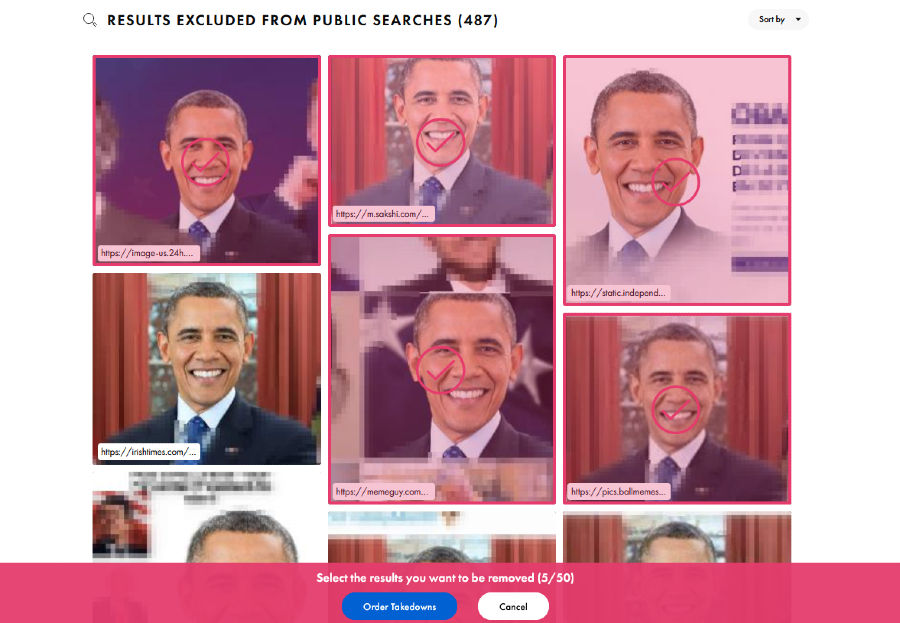
You can access the “PROtect Takedown Requests” function in your user’s panel, under the “PROtect” tab. Firstly, you will have to access your PROtect Image results and click on the picture you wish to send out a Takedown Notice for.
Then, by clicking on the “Order Takedown” button, you will be met with the option to choose multiple pictures to add to the ”PROtect Takedown Requests” service. However, that’s not all. The next step is choosing the reason on why you wish to have these pictures removed from their source websites.
 Upon choosing alll the results and clicking on the "Order Takedowns" button, you will be redirected to the TAKEDOWN NOTICES DETAILS page, where every takedown will be listed. On every one of those takedowns, you have to choose your reason for removal from the following options:
- Copyrights infringement; this is a DMCA notice, where you have to give a detailed explanation about the source of the image, proving that you are its copyright holder,
- Privacy Violation; this is GDPR notice,
- I just don’t want to appear on this website, but I have no legal basis to remove the image; if you do not submit a scan of your document and signature, then this simple notice is all we can send to the source website.
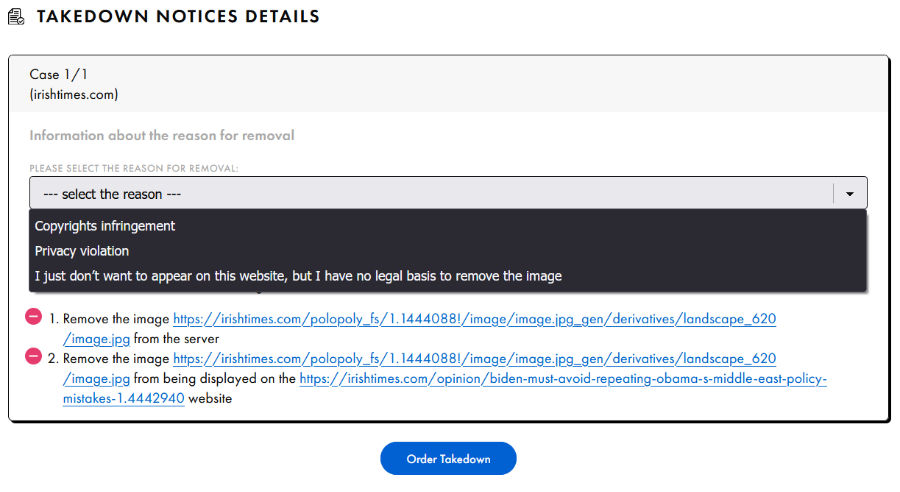
You also have the option to choose if you want to request for the picture to be removed from both the website and the server it is saved on. By default, you have the option to remove the image from all locations chosen, however by clicking on the red minus button, you can unselect one of the links, meaning that a takedown will not be sent for that picture.

Filling out your personal data
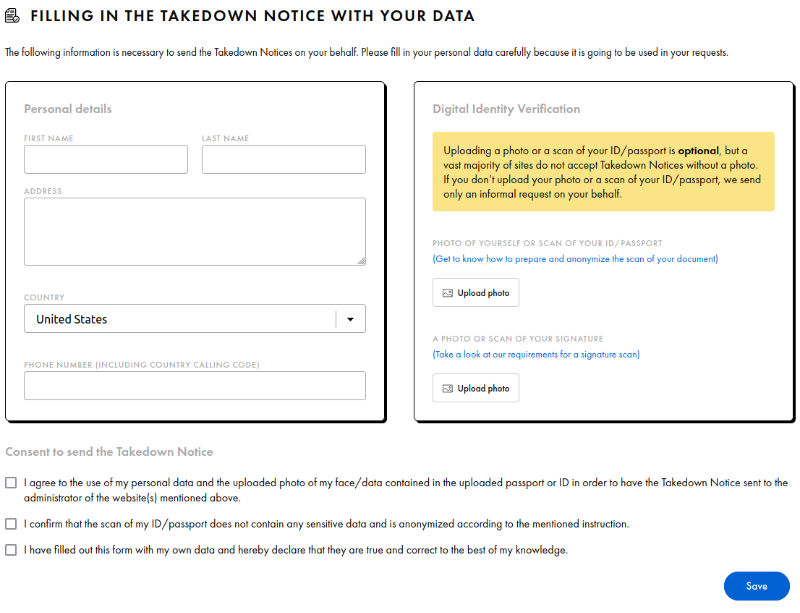
In order for us to send out Takedown Notices for your photos, you will then have to fill out your personal data in the respective tab. This step is essential, because the notices cannot be sent out anonymously. We ask you to fill the information out truthfully. You may have doubts about disclosing your personal data to the entity that has been using your photo illegally. We can understand that, but until you order a specific photo to be removed, we won’t send any notices containing your personal data. It is also important to note, that in the case where you don't submit a scan of your document and signature, we can only send out an informal request on your behalf.
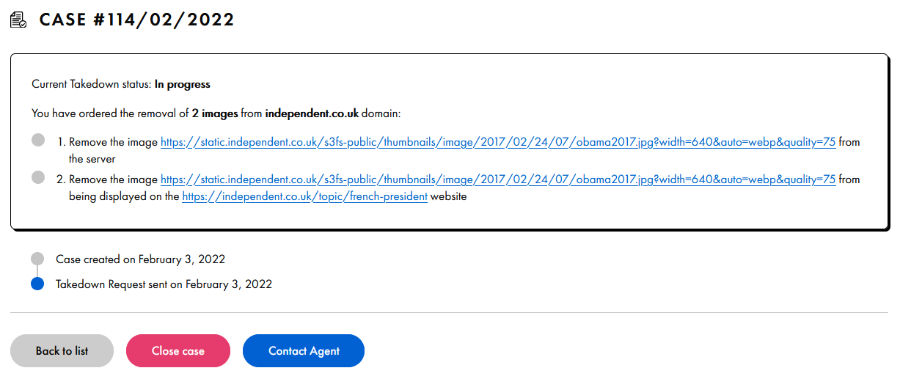
Where to track the progress of your takedowns
You can track the progress of the Takedown Notices which have been sent out by accessing the “Takedown Requests” tab under the PROtect panel in your user’s panel. On the right side of every case, you will see a short status. By default, you can view your active cases only, however that can be changed from the filter list above your cases.

What the purpose of the “Close case” function is
When you are aware that a picture has been removed from the source website, but somehow we haven’t marked it as deleted, you can do so yourself by choosing the “Close case” option. This option allows us not to focus on a case that’s already been solved and instead focus on other ones.
What self-report is
There are some cases where source websites provide contact forms as the only available way of getting touch in them. In such cases, you will have to reach out to them personally. We will provide you with the appropriate text you need to send out to such websites.
What the agent time is
Every month, PROtect users receive 240 minutes of agent time. This is the time that our agents will be dedicating to your “PROtect Takedown Requests” cases (drafting the Takedown Notices, sending them out, monitoring the cases) in a month. Minutes are taken off every time you order a takedown. You can see how much time you have left in the Agent tab.


These are the most essential features in PROtect, but we also have an entire FAQ section dedicated to it. We believe it might prove helpful to you: https://pimeyes.com/en/contact#protect.
However, if you have any additional questions which haven’t been covered on here or our FAQ section, you reach out to us via our contact form. Our support staff will get back to you as soon as possible!